Showing posts with label How Hard Could it Be?. Show all posts

Thursday, January 10, 2013

Confessions of a Serial (plant) Killer


I'm starting to feel better about killing house plants.  I used to have some pangs of guilt after purchasing a hapless violet or a thriving schefflera at Home Depot knowing that once it was in my posession, it was toast.  Some people, like my grandfather, are born with a green thumb but I unfortunately, was not. I've always known this about myself and yet I can't help getting sucked in every year by the spring hyacinths and the poinsettias at Christmas.  They're all doomed once they are placed in my shopping cart, of course.  I pretty sure I've heard them let out little cries for help as they're wheeled out into the parking lot.

My latest victims are two 4 inch pots of fresh basil.  I found them at the grocery store on an end cap in the produce section. With an eye toward pesto,  I carefully selected the two most promising plants; both were wrapped up in cellophane and looked incredibly healthy.  How hard could it be?  I thought to myself.  I believe I can keep them alive for at least a few months.  Well, perhaps a few weeks.  Is that too much to ask?
You must keep in mind that I live in Hawaii where everyone feels good about their green thumb because things grow outside without any effort at all.  I have literally thrown "dead" plants out into the back yard only to have them come back at me bigger, better, and with blooms in just a few short weeks.

Unfortunately, as you no doubt already gathered from the title of my post,"bigger, better, and with blooms" was not to be the fate of my basil.  Despite my attempt to water it regularly and put it in a cheery spot on my windowsill, it croaked within about a week and a half of living under my roof.

C'est la vie.

I said I was feeling better about killing house plants.  I suppose that's a sign that I am, indeed, a certified serial (plant) killer.  A run of the mill plant killer feels more remorse than this I think.  It's starting to get easy for me.  In fact, I'm planning another trip to Home Depot tomorrow.  I hear they've got gerber daisies in.

Wednesday, December 19, 2012

How to Make a Home School Wiki


(Originally published as "Technology in the Homeschool: Gettin’ Your Wiki On" 9/30/11 on my previous blog.)
                 I spend a good deal of time gleaning the internet for information and resources to enhance our home school.  In my first year of homeschooling, I would find a website that looked promising and I’d write it down on a piece of paper so I could come back to it later if I ever needed it.  Sometimes I’d bookmark it.  Or put  a sticky on my computer.  This system started to deteriorate rapidly as my bookmark bar became overloaded and I could never find that piece of paper with the link to the really cool animation of mitosis.  I needed a solution to help me organize the cool and useful stuff I was finding.  That’s when I learned about wikis. 
             

              If you’re like me the first thing that pops into your head when you hear “wiki” is “not a credible source for research papers.”  Actually, that’s Wikipedia, which is one of about a gazillion wikis out there.   According to Wikipedia (I know, I know), a wiki is a website that allows the creation and editing of any number of interlinked web pages via a web browser using a simplified markup language or a WYSIWIG text editor…etc…  Whatever that is.  Don’t let the HTML talk scare you, it’s easier than it sounds. It’s just a great big organization tool to help you rein in the information dragon.   I attended a full day seminar teaching home schooling parents how to utilize a Wiki in the classroom and it has revolutionized the way we organize and manage the power of the internet for school. 

               The internet fosters collaboration and the sharing of knowledge.  As a result, incredible amounts (I think the technical term is “scads”) of information and data are added to the collective intelligence each day.  For those of us who are still trying to figure out how to play 10 simultaneous games of Words With Friends this can feel very overwhelming.  Suddenly, we not only have to tend to vast amount of laundry, lesson plans and healthful meals (and WWF) but we also have to somehow conquer and harness the internet and bring it under our dominion.  A place for everything and everything in its place.    This can be a fast and steep learning curve.   Sometimes it’s tempting to just pretend it’s not there.  Like that pile of papers we’ve been meaning to go through. 

               I remember when I was in high school one of my classmates at our private school showed up in the parking lot with a new car- that had a phone in it!  A no-kidding full-sized bat phone.  We were all amazed.  This was 1989 and we all thought it was ridiculously decadent and “out there”.  Who in the world talks on the phone while they are driving?  Who would they talk to anyway?  No one has phones in their car. You can always stop at a pay phone if you need to call someone.  Or just wait till you get home, for goodness sake!  Little did we know…20 years later we would be wondering what we did before we carried phones with us everywhere we went.  Technology makes it easy for people to stay connected  in ways we might not have thought possible.  Same with the Internet.  Technology is making it easy to get information.  The problem is what to do with it once you’ve got it.  That’s where it starts to feel daunting.  A wiki can help you organize information, media, resources, discussion threads, lists and collaborate with others.  It’s very versatile.

           Let me give you a more concrete example of one way you could use a wiki.  This year my son is taking Apologia Physics.  I have set up a page on the wiki called Apologia Physics 2011-2012.  Off of that page I have all of the book chapters listed and each one links to a separate page.  So for instance, I have “Chapter 4 Motion in Two Dimensions”.  On this page I have links to the lectures for Chapter 4 from an open source online Apologia Physics Class.  So there is a link for “Lecture 1- Navigation in two dimensions” and “Lecture 2- Range Equation”.  I’ve also linked to several Khan Academy lectures and physics sites in case he needs extra clarification.

            You can do this for any course.  Last year, I took the Apologia Exploring Creation with Physical Science curriculum and found links to videos and extra resources for many of the concepts in the chapters.   So for instance, one whole page was dedicated to Chapter 3 and on that page there were links to extra material for the kids to watch.  Yes, it took some time to search and gather information to put on the wiki but it helps to have it all in one place.  Plus, you can use the information year after year because it’s always right where you left it- on the wiki.

            I could walk you through all of the steps to setting up your wiki but someone has already beat me to it.  Thank goodness.  No sense in reinventing the wheel.  Here’s a tutorial called How to Build an Educational Wiki to get you started.  

            Not many things in life are free- but your wiki can be! Sign up for an account at WikiSpaces for Educators to get your free wiki.   Be sure you make it private unless you want to have it viewable and editable by everyone.

             One thing I will mention is to pay attention to whether you are linking to an internal page or an external page.  If you find a web page or video on You Tube you want to link to your wiki you should have it open in a separate external web page opened in a new window (click the box for new window) so it isn’t stored on your wiki.  Likewise, all private pages should be linked internally. 


              I am not terribly techie so if I can do it, you can probably do it even better.  If you are just getting started here’s how I suggest you organize your (very basic) wiki:


1. Click the Edit Navigation link and delete the blue Page List widget. Now you will be able to edit the navigation bar just like you would edit a wiki page to add links and explanatory text.

If you need assistance editing a page you can watch the very helpful Wikispaces video tours.  In fact, you should probably watch it right now before your proceed. All of the “Getting Started” video tutorials are great.  I’ve also had good success with their customer service when I needed to find out the answer to a question I couldn’t ascertain from the website. 

Now that the blue page list widget is gone, type in these words- one per line- and save.

Home
School Members
Classes
Resources
RSS Feeds

Now you should see these pages in a list in your navigation bar, which is probably on your right.
2. In your navigation bar, click on “Home”. This will take you to a page that says it does not exist yet.  Click on “Edit Page” and type an introduction of who you are and the purpose of the wiki.  For instance: “Welcome to the XYZ Home school Wiki!   Here’s where we post assignments, logs, links to websites and resources for our school. “ Save your page.

3. In your navigation bar, click on “School Members”. Click on Edit Page and type the names of your children and yourself.  One name per line.    

Highlight the first name in the list and click on “link” in the toolbar.  A box will open that has two tabs on it on the top.  One is for internal links to pages within your wiki- this is called “Wiki Link” and one to “External Links”. External links are for anything outside your wiki- like a You Tube video or a webpage address.   External links should always be opened in a new window.  Link these to internal pages with the same name as your highlighted text.

These personal pages can be used by each individual as a bulletin board where they can organize resources and fun stuff they find on the web. 


4. In your navigation bar, click on “Classes”.  Off of “Classes” make internal Wiki links to pages for each class you have and include information that will identify the specific student, subject and school year.     

For example: 8th grade Art History- son#1- 2010-2011.

 Off of “Classes” make links to assignments, external videos, resources, finished work, etc.  (You could also put these class specific pages under each child’s section under “School Members”.)

5. In your navigation bar, make an internal link for “Resources”.  Off of this page make internal links to general subjects and topics.  For instance: Home school links, Co-op Resources, Stuff I want to read sometime, Curriculum, Inspiration, Technology,  Science, Literature, Math, Projects, Sports, Scouting, Music, Blog and Log, Administration, etc. Off of each of these you can create pages where you link to external websites, videos and  RSS Feeds.

5.  You may want to keep up with certain websites that have RSS feeds. In your navigation bar, make an internal link for “RSS feeds”.  Off of this page use the edit button and click on “Widget” to add a widget.  It will open a link where you can paste the RSS HTML  For the feeds you want to watch.

6.  If your family blogs or your have blogs you want to watch, you can make a page that keeps them all in one place.   I also link to internal logging charts I‘ve made using the “Table” button in the toolbar.  We use these to keep up with reading logs, volunteer service logs and physical fitness logs. (More on those later)

            You can use a wiki to collaborate on projects, reports, papers, or classes.  Just invite other people to join you and start working together.             


            I consider our Wiki to be “fair to middlin” as we say in the south. We use it almost daily and it serves us very well.   No doubt there is a ton more I could be doing with it and as soon as I fold this next basket of laundry I’m going to get right on it.  

            While I’m folding, I encourage you to poke around WikiSpaces for Education and give it a try. (You could also try Wet paint.) You’ll probably find ways to use a wiki that I haven’t even thought of.  If so, leave me a comment and do your civic duty of adding to the collective intelligence.  Let me know how you use your wiki in your home school!

Friday, December 7, 2012

How Hard Could it be? Make your Own Tamales


When we lived in San Diego many moons ago, my dear friend Ana's mother, Mafalda,  taught me how to make the best tamales ever.  I am forever indebted to her for taking the time to pass on this wonderful tradition.  Usually right after the feathers have stopped flying after Thanksgiving I get in touch with my inner Latina self and start the tamale machine rolling.  Actually, that is not quite accurate.  I start forming my tamale brigade.  Most of the members of my brigade are indentured family members but I am not above accepting anyone who looks strong and up to the task.  Tamale making is not for wimps. It takes a village to make a bunch of these suckers.  

I only do this once a year which produces a few problems. First,  I have to read through my recipe and try to remember what I did last year.  Fortunately, I have made this easier on myself by writing helpful notes at the bottom of the recipe.  "2006- a bit too dry.  Use more broth in the masa."  Next, I have to figure out how to wrap them.  Yes, after years of making them, every year I still look at a corn husk and say "How did I do that last year?" I've come to the conclusion that it doesn't matter.  Just wrap those babies up however you want and steam them.  Still, It takes me a while to get in the groove.  Finally, after 10 minutes of trying to assemble 1 tamale at a time per person I remember that doing it assembly line is best.  After that, it's smooth sailing.  

The whole process takes 2 days.  The first day I cook 13-20 lbs of pork butt in the crock pot, shread it and make the chile sauce.  The second day I make the masa add the gravy to the meat and assemble the tamales with my friends and indentured relatives.  

Since it is so labor intensive I always make a ton of these things at once.  Usually at least 8 dozen.  It's our tradition to eat them on Christmas eve.  They keep for months in the freezer and they make great lunches, dinners and snacks.  You just pop them in the microwave for about a minute and voila!  They're usually gone by February.  

Of course, there is no recipe for Mafalda's tamales.  I wrote the instructions down as I spoke to her on the phone one year trying to remember the steps.  This is not an exact science and I am sure I don't do it all correctly.  I know I can't do them as wonderfully as Mafalda but this is how I make them.  Feel free to experiment and change things up. Mine never turn out magazine perfect but they usually taste great.  As my mom always says- "You are the boss in your kitchen!"  
 Tamales

Ingredients
2 or 3 (3 oz.) pkgs dried chili pods—California/ New Mexico, or Pasilla
1 square chicken bouillon
1 bulb garlic
Boston butt, pork roast or pot roast, beef shoulder roast- any shredding meat --2 lb per dozen tamales
Onions- a bag
chicken broth—buy the large cartons of chicken broth 3-4.  You’ll use a lot.
2 T flour
cumin as desired
salt &pepper
tamale masa—2 or 3 bags
oil or Crisco- 1-2 tubs
baking powder
corn husks


2 lb. meat =a dozen tamales

Chile Sauce

2 or 3 (3 oz.) pkgs dried chili pods—California/ New Mexico, or Pasilla
1 square chicken bouillon
2 cloves crushed garlic

Put on gloves.  Open and clean seeds out of chilies.  Rinse under cold water.  Boil water and add bouillon to it.  Add chilies. Turn water off and cool.  Put chiles and garlic and some salt in blender.  Puree (add water to make it into a sauce consistency if necessary).  This sauce can be frozen.


Meat:
Can use beef or pork—or both

Boston butt, pork roast or pot roast, beef shoulder roast- any shredding meat

2 lb meat = 12 tamales

Roast meat in oven bags or crock pot.  Add onion, garlic, salt and pepper. 
Save all juices for gravy!! 
Shred or chop when cool. 

Gravy:
Use meat juices
chicken broth
½ onion chopped
1 clove garlic crushed
2 T flour
chili sauce as needed—use plenty for flavor
cumin as desired
salt

Sauté onion and garlic in saucepan in oil.  Add flour.  Add chili sauce and some meat juices.  Add chicken broth as needed.  Wisk together till it makes gravy.  Correct seasonings.  Make sure it tastes the way you want the tamale to taste—add other seasonings if you think they’d taste good.  I like to add cumin.

Add the meat to the gravy.  It should be a wet consistency-not too dry!  Don’t freeze cooked meat and use since you will have to freeze tamales later.  Make the day before.

Masa
Buy the bags of tamale masa at the grocery store and follow directions or :

2 ½ c. masa
½ c oil or Crisco
½ t. baking powder
1 t. salt
2 c. chicken broth or meat juice  (buy the big cartons of broth since you’ll be making a lot)
add a spoonful or so of chili sauce for color and flavor

Mix till fluffy.  This takes about 10 minutes.  You’ll need many batches of this stuff!  I’d buy at least 2 bags for a large tamale making party.


Corn Husks:
Buy dried corn husks- bigger is better --easier to work with. You need plenty because some will be rejects. 
Soak them in warm water and clean them.  Take all the strings off. 
Peel some ½ inch strips from the husks to use for tying the tamales together.  Set these aside.   I’ve also used raffia—but don’t get the colored kind because they bleed!

Putting them together: Corn Husk, Masa, Tamale Meat

There is no right way to do this so you can experiment:
The way I do it is:
For a large husk I use one
For small husks I put two overlapping together with large ends facing each other

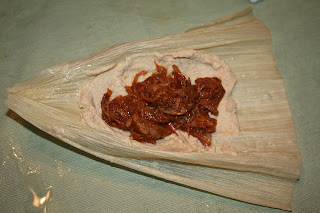
Place the husk with the bumpy side down. Masa goes on the smoother side, which is curling up toward you.

then put a spoonful of the masa in the middle using the back of a serving spoon or spatula.  Spread the masa out like you are making a peanut butter sandwich (in a rectangle shape- not all over the husk). 
Next, put a spoonful of meat in the middle of the masa,  

Then roll it up like a tootsie roll and tie the ends with the husk strips (make a knot).  If the husk doesn’t’ go all the way around make sure to add another one to close the gap—there should be no tamale showing out side of the husks.  Other wise you’ll have problems with them leaking during cooking.  You want the tamale to be tight.

The tamales can be frozen like this or you can go ahead and steam them and then freeze them.  I cook first then freeze.

This is a 16" Chinese steamer with two levels.  They sell them in Chinatown in Honolulu for Maunapuas and other steamed dishes.  I love using it for tamales. This one can hold about 50.
To cook:
Use a large stockpot and put a veggie strainer in the bottom or something to keep them up off the bottom.  Add water to cover the bottom but not higher than the strainer—you don’t want tamales sitting in water.  Turn on the heat and start to boil slowly. Then place the talames in the stockpot.  Soak a washcloth and put it over the top.  You can put foil over this if you want—I don’t know if it helps, I just do it.   Put the lid on the pot.  Check it every once in a while and keep adding water down the inside edges of the pot so it doesn’t boil dry.  You want them to steam evenly.  (Careful not to get water inside the tamales). Steam for 1 hour. Eat immediately or freeze after they’ve cooled.  They can sit warming on the stove for a little while.  To eat after freezing: put in the microwave for about 1-2 minutes.


2006 Hawaii- 20 lbs meat made 9 dozen tamales. Fed 20 people and had leftovers.  Most people eat 2 or 3 max. 


Nota Bene: This is what happens if you turn your back while your 15 year old son is making tamales.  He makes a peanut butter and chocolate chip one.  Yes, it ended up in the steamer.  Yes, I sent him fishing for it so it didn't leak on all of the other ones.


Friday, November 30, 2012

Twinkies for Fun and Profit: How to make your own


I've been on a major Twinkie rush the past few weeks.  It's not just the sugar though.  My son, the resident entrepreneur and early riser announced to us early one Friday morning that Hostess was going out of business and that we should drop what we were doing and rush out right that minute to buy some to sell on E-bay.  It's times like these that I remember why I love homeschooling so much.  Flexibility and having the world as your classroom! We skipped breakfast to go in search of our Twinkie fortune.

To be honest, I didn't really think we would succeed in our Twinkie resale enterprise but I wasn't about to step on enthusiasm.  We arrived at the grocery store and lined up behind the retirees to wait for them to open the doors. Each of us was eyeing the old folks hoping none of them was aware of the treasure that was sitting on the shelf on aisle 16.  The automatic doors opened and there was a rush of gray hair- all headed to the produce.  Whew!  We zoomed over to the bread aisle and there they were- Ding Dongs, HoHos, Zingers and Twinkies!  A gloriously full shelf of them!  Another guy was already there sheepishly carrying three boxes back towards the check out line.  He passed us with his Twinkies and then noticed that we were there for the same thing.  As we loaded up our cart he came back down the aisle and said that he would probably get a couple more- just in case Hostess really did go out of business for good.  We agreed with him.  It was a very good idea.   

When we got home we immediately listed them on E-bay.  We decided that a 24 hour auction would be best because Hostess could end up getting bought out and start production again on Monday and then the Twinkies would only be worth face value and we'd have to eat all those sugary snacks by ourselves.  Maybe not the worst fate ever, but still, we've all had that "ate too much" junk food nausea before and were not looking forward to it.  We started the bidding at a penny and pulled out all of our cheesy salesmanship tools. 

Our listing read: "No reserve on this Hostess Jackpot!  Get your Twinkies, Ho Hos, and Ding Dongs before they're gone!   They will probably survive the zombie apocalypse!   Don't be left without them!  In a few years you will be kicking yourself if you don't scoop these up right now before they're gone forever. Coming to you with Aloha from Hawaii. The only reason we're letting these go is because Zombies can't swim so we're safe here!"

Now really, who would fall for this stuff, we chortled to ourselves.  Well, 17 people bid on that listing and we made $99.50 on our Hostess sales.  Not a bad investment. 


We were thrilled to see economics at work.  Scarcity leads to increased prices!   We had just proven it in our Twinkie experiment.  The kids packed them up in boxes and we sent them off to their new owners.  Of course, we've kept a few boxes of Hostess stuff in reserve because truly, they never go bad- and plus, what if we have a Twinkie attack or suddenly someone is willing to pay a million dollars for a box or worse yet, what if zombies invade? 

Since we've got to keep these Twinkies under lock and key until people are really desperate and we can use them to fund the kids college (why did I leave some on the shelf?), we decided that we would try our hand at making some. By now you know that my mantra is "how hard could it be"?  I'm always up for trying stuff.  So we found a recipe online.  They were a fun project and they actually tasted just like the real thing.  Give it a try!

Here are the ingredients: 


Non-stick spray
4 egg whites
One 16-ounce box golden pound cake mix (We tried both pound cake and Butter  Golden cake. Butter Golden Golden cake had a better Twinkie texture while pound cake was more firm.  Pictures below)
2/3 cup water
Filling
2 teaspoons very hot water
1/4 teaspoon salt
2 cups marshmallow creme (one 7-ounce jar)
1/2 cup shortening
1/3 cup powdered sugar
1/2 teaspoon vanilla


Here's how you make them:

Preparation
You will need a spice bottle, approximately the size of a Twinkie, ten 12 x 14 -inch pieces of aluminum foil, a cake decorator or pastry bag, and a chopstick.

Preheat oven to 325 degrees.

Fold each piece of aluminum foil in half twice. Wrap the folded foil around the spice bottle to create a mold. Leave the top of the mold open for pouring in the batter. Make 10 of these molds and arrange them on a cookie sheet or in a shallow pan. Grease the inside of each mold with a light coating of non-stick spray.

Disregard the directions on the box of cake mix. Instead, beat the egg whites until stiff. In a separate bowl combine cake mix with water and beat until thoroughly blended (about 2 minutes). Fold egg whites into the cake batter and slowly combine until completely mixed.

Pour the batter into the molds, filling each one about 3/4 of an inch. Bake in the preheated oven for 30 minutes, or until the cake is golden brown and a toothpick stuck in the center comes out clean.

For the filling, combine salt with the hot water in a small bowl and stir until salt is dissolved. Let this mixture cool.

Combine the marshmallow creme, shortening, powdered sugar and vanilla in a medium bowl and mix well with an electric mixer on high speed until fluffy.

Add the salt solution to the filling mixture and combine.

When the cakes are done and cooled, use a skewer or chopstick to make three holes in the bottom of each one. Move the stick around inside of each cake to create space for the filling.

Using a cake decorator or pastry bag, inject each cake with filling through all three holes.

Serving Size
Serves 10


Saturday, November 17, 2012

How to Make Cute Candy Thanksgiving Turkeys


These candy turkeys are tons of fun to make for classroom or office parties,  providential buffets (I don't believe in luck), Thanksgiving "hello" gifts for neighbors, or decorations for place settings.  They are easy to make- especially if you have a friend or two helping to do it assembly-line style.

I would love to give credit to the person who came up with this brilliant idea.  Unfortunately, I have no clue where I first saw it.  I've been making these for years and they are always a favorite.  It just doesn't seem like Thanksgiving if we haven't made the turkeys!


To make about 60 of them you only need 5 ingredients: 

1 package of 60 sandwich cookies (Each cookie makes 1 turkey), your choice of color
2 cans of chocolate frosting
1 cup of powdered sugar
3 bags of orange slice candies (with approximately 20 per bag so you have a total of 60)
1-2 bags of candy corn depending on how big the bag is.  You'll need 360 whole ones total. 


1. Mix 1/2 cup of powdered sugar with one can of frosting to make the frosting a little more stiff.  (Do the same with the second one if you need more frosting.)


2. Fill a pastry bag with the frosting. (Use a large star tip.)


 3. Carefully pull the cookies apart and scrape off the filling.  Discard the filling.


4. Pipe a semi-circle of icing onto half of the cookies.


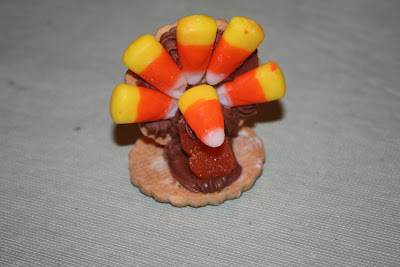
5. Press 5 candy corns into the icing in a fan pattern.  Make sure they are evenly placed.  They shouldn't hang too far off of the edge of the cookie.


6. Cut the orange slices at the 2/3 mark.  Eat the smaller pieces.  The larger ones will be the bodies and should be cut at a slight slant or almost straight up depending on how good your icing is at holding them.  You can experiment a little- I usually assemble 1 completely to get a feel for how they are made (since I only make them once a year).  After that I start with the assembly line.


7. Pipe a 1" line of icing onto the other half of the cookies. (See below) Place the orange slices with the smaller ends toward the front and the cut ends toward the back of the cookie.  (See picture.)  Pipe a blob of icing below the 5 candy corn feathers.  This icing will be the glue that holds the feathers to the orange slice body.  In the picture below the cookie with the candy corns at the far right is an example of the feathers and the cookie with the orange slice second from the right is an example of the bodies.  So now you should have half cookie feathers and half cookie bodies.  (If your icing is hardening quickly you can do these in smaller groups.)


8.  This is the tricky part.  Take the feather cookie and press the icing from it into the orange slice.  Hold it there and pipe a chocolate dot at the back to add extra strength to hold up the cookie.  Finally, pipe a dot of icing onto the top of the orange slice and place a whole candy corn on it for the head (beak facing out!).  

Voila, you are finished!  


9.  Here's a picture of the steps all in a row.


 10.  And here is the finished product. Cute as a button and guauanteed to be eaten only by children and others who have a very high tolerance for sugar.


Enjoy!  Let me know how they turn out if you try them- and share your tips!