Showing posts with label Eating with Aloha. Show all posts

Friday, December 7, 2012

How Hard Could it be? Make your Own Tamales


When we lived in San Diego many moons ago, my dear friend Ana's mother, Mafalda,  taught me how to make the best tamales ever.  I am forever indebted to her for taking the time to pass on this wonderful tradition.  Usually right after the feathers have stopped flying after Thanksgiving I get in touch with my inner Latina self and start the tamale machine rolling.  Actually, that is not quite accurate.  I start forming my tamale brigade.  Most of the members of my brigade are indentured family members but I am not above accepting anyone who looks strong and up to the task.  Tamale making is not for wimps. It takes a village to make a bunch of these suckers.  

I only do this once a year which produces a few problems. First,  I have to read through my recipe and try to remember what I did last year.  Fortunately, I have made this easier on myself by writing helpful notes at the bottom of the recipe.  "2006- a bit too dry.  Use more broth in the masa."  Next, I have to figure out how to wrap them.  Yes, after years of making them, every year I still look at a corn husk and say "How did I do that last year?" I've come to the conclusion that it doesn't matter.  Just wrap those babies up however you want and steam them.  Still, It takes me a while to get in the groove.  Finally, after 10 minutes of trying to assemble 1 tamale at a time per person I remember that doing it assembly line is best.  After that, it's smooth sailing.  

The whole process takes 2 days.  The first day I cook 13-20 lbs of pork butt in the crock pot, shread it and make the chile sauce.  The second day I make the masa add the gravy to the meat and assemble the tamales with my friends and indentured relatives.  

Since it is so labor intensive I always make a ton of these things at once.  Usually at least 8 dozen.  It's our tradition to eat them on Christmas eve.  They keep for months in the freezer and they make great lunches, dinners and snacks.  You just pop them in the microwave for about a minute and voila!  They're usually gone by February.  

Of course, there is no recipe for Mafalda's tamales.  I wrote the instructions down as I spoke to her on the phone one year trying to remember the steps.  This is not an exact science and I am sure I don't do it all correctly.  I know I can't do them as wonderfully as Mafalda but this is how I make them.  Feel free to experiment and change things up. Mine never turn out magazine perfect but they usually taste great.  As my mom always says- "You are the boss in your kitchen!"  
 Tamales

Ingredients
2 or 3 (3 oz.) pkgs dried chili pods—California/ New Mexico, or Pasilla
1 square chicken bouillon
1 bulb garlic
Boston butt, pork roast or pot roast, beef shoulder roast- any shredding meat --2 lb per dozen tamales
Onions- a bag
chicken broth—buy the large cartons of chicken broth 3-4.  You’ll use a lot.
2 T flour
cumin as desired
salt &pepper
tamale masa—2 or 3 bags
oil or Crisco- 1-2 tubs
baking powder
corn husks


2 lb. meat =a dozen tamales

Chile Sauce

2 or 3 (3 oz.) pkgs dried chili pods—California/ New Mexico, or Pasilla
1 square chicken bouillon
2 cloves crushed garlic

Put on gloves.  Open and clean seeds out of chilies.  Rinse under cold water.  Boil water and add bouillon to it.  Add chilies. Turn water off and cool.  Put chiles and garlic and some salt in blender.  Puree (add water to make it into a sauce consistency if necessary).  This sauce can be frozen.


Meat:
Can use beef or pork—or both

Boston butt, pork roast or pot roast, beef shoulder roast- any shredding meat

2 lb meat = 12 tamales

Roast meat in oven bags or crock pot.  Add onion, garlic, salt and pepper. 
Save all juices for gravy!! 
Shred or chop when cool. 

Gravy:
Use meat juices
chicken broth
½ onion chopped
1 clove garlic crushed
2 T flour
chili sauce as needed—use plenty for flavor
cumin as desired
salt

Sauté onion and garlic in saucepan in oil.  Add flour.  Add chili sauce and some meat juices.  Add chicken broth as needed.  Wisk together till it makes gravy.  Correct seasonings.  Make sure it tastes the way you want the tamale to taste—add other seasonings if you think they’d taste good.  I like to add cumin.

Add the meat to the gravy.  It should be a wet consistency-not too dry!  Don’t freeze cooked meat and use since you will have to freeze tamales later.  Make the day before.

Masa
Buy the bags of tamale masa at the grocery store and follow directions or :

2 ½ c. masa
½ c oil or Crisco
½ t. baking powder
1 t. salt
2 c. chicken broth or meat juice  (buy the big cartons of broth since you’ll be making a lot)
add a spoonful or so of chili sauce for color and flavor

Mix till fluffy.  This takes about 10 minutes.  You’ll need many batches of this stuff!  I’d buy at least 2 bags for a large tamale making party.


Corn Husks:
Buy dried corn husks- bigger is better --easier to work with. You need plenty because some will be rejects. 
Soak them in warm water and clean them.  Take all the strings off. 
Peel some ½ inch strips from the husks to use for tying the tamales together.  Set these aside.   I’ve also used raffia—but don’t get the colored kind because they bleed!

Putting them together: Corn Husk, Masa, Tamale Meat

There is no right way to do this so you can experiment:
The way I do it is:
For a large husk I use one
For small husks I put two overlapping together with large ends facing each other

Place the husk with the bumpy side down. Masa goes on the smoother side, which is curling up toward you.

then put a spoonful of the masa in the middle using the back of a serving spoon or spatula.  Spread the masa out like you are making a peanut butter sandwich (in a rectangle shape- not all over the husk). 
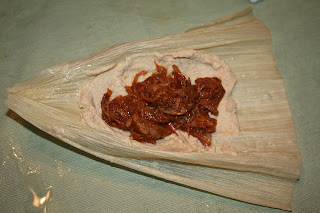
Next, put a spoonful of meat in the middle of the masa,  

Then roll it up like a tootsie roll and tie the ends with the husk strips (make a knot).  If the husk doesn’t’ go all the way around make sure to add another one to close the gap—there should be no tamale showing out side of the husks.  Other wise you’ll have problems with them leaking during cooking.  You want the tamale to be tight.

The tamales can be frozen like this or you can go ahead and steam them and then freeze them.  I cook first then freeze.

This is a 16" Chinese steamer with two levels.  They sell them in Chinatown in Honolulu for Maunapuas and other steamed dishes.  I love using it for tamales. This one can hold about 50.
To cook:
Use a large stockpot and put a veggie strainer in the bottom or something to keep them up off the bottom.  Add water to cover the bottom but not higher than the strainer—you don’t want tamales sitting in water.  Turn on the heat and start to boil slowly. Then place the talames in the stockpot.  Soak a washcloth and put it over the top.  You can put foil over this if you want—I don’t know if it helps, I just do it.   Put the lid on the pot.  Check it every once in a while and keep adding water down the inside edges of the pot so it doesn’t boil dry.  You want them to steam evenly.  (Careful not to get water inside the tamales). Steam for 1 hour. Eat immediately or freeze after they’ve cooled.  They can sit warming on the stove for a little while.  To eat after freezing: put in the microwave for about 1-2 minutes.


2006 Hawaii- 20 lbs meat made 9 dozen tamales. Fed 20 people and had leftovers.  Most people eat 2 or 3 max. 


Nota Bene: This is what happens if you turn your back while your 15 year old son is making tamales.  He makes a peanut butter and chocolate chip one.  Yes, it ended up in the steamer.  Yes, I sent him fishing for it so it didn't leak on all of the other ones.


Friday, November 30, 2012

Twinkies for Fun and Profit: How to make your own


I've been on a major Twinkie rush the past few weeks.  It's not just the sugar though.  My son, the resident entrepreneur and early riser announced to us early one Friday morning that Hostess was going out of business and that we should drop what we were doing and rush out right that minute to buy some to sell on E-bay.  It's times like these that I remember why I love homeschooling so much.  Flexibility and having the world as your classroom! We skipped breakfast to go in search of our Twinkie fortune.

To be honest, I didn't really think we would succeed in our Twinkie resale enterprise but I wasn't about to step on enthusiasm.  We arrived at the grocery store and lined up behind the retirees to wait for them to open the doors. Each of us was eyeing the old folks hoping none of them was aware of the treasure that was sitting on the shelf on aisle 16.  The automatic doors opened and there was a rush of gray hair- all headed to the produce.  Whew!  We zoomed over to the bread aisle and there they were- Ding Dongs, HoHos, Zingers and Twinkies!  A gloriously full shelf of them!  Another guy was already there sheepishly carrying three boxes back towards the check out line.  He passed us with his Twinkies and then noticed that we were there for the same thing.  As we loaded up our cart he came back down the aisle and said that he would probably get a couple more- just in case Hostess really did go out of business for good.  We agreed with him.  It was a very good idea.   

When we got home we immediately listed them on E-bay.  We decided that a 24 hour auction would be best because Hostess could end up getting bought out and start production again on Monday and then the Twinkies would only be worth face value and we'd have to eat all those sugary snacks by ourselves.  Maybe not the worst fate ever, but still, we've all had that "ate too much" junk food nausea before and were not looking forward to it.  We started the bidding at a penny and pulled out all of our cheesy salesmanship tools. 

Our listing read: "No reserve on this Hostess Jackpot!  Get your Twinkies, Ho Hos, and Ding Dongs before they're gone!   They will probably survive the zombie apocalypse!   Don't be left without them!  In a few years you will be kicking yourself if you don't scoop these up right now before they're gone forever. Coming to you with Aloha from Hawaii. The only reason we're letting these go is because Zombies can't swim so we're safe here!"

Now really, who would fall for this stuff, we chortled to ourselves.  Well, 17 people bid on that listing and we made $99.50 on our Hostess sales.  Not a bad investment. 


We were thrilled to see economics at work.  Scarcity leads to increased prices!   We had just proven it in our Twinkie experiment.  The kids packed them up in boxes and we sent them off to their new owners.  Of course, we've kept a few boxes of Hostess stuff in reserve because truly, they never go bad- and plus, what if we have a Twinkie attack or suddenly someone is willing to pay a million dollars for a box or worse yet, what if zombies invade? 

Since we've got to keep these Twinkies under lock and key until people are really desperate and we can use them to fund the kids college (why did I leave some on the shelf?), we decided that we would try our hand at making some. By now you know that my mantra is "how hard could it be"?  I'm always up for trying stuff.  So we found a recipe online.  They were a fun project and they actually tasted just like the real thing.  Give it a try!

Here are the ingredients: 


Non-stick spray
4 egg whites
One 16-ounce box golden pound cake mix (We tried both pound cake and Butter  Golden cake. Butter Golden Golden cake had a better Twinkie texture while pound cake was more firm.  Pictures below)
2/3 cup water
Filling
2 teaspoons very hot water
1/4 teaspoon salt
2 cups marshmallow creme (one 7-ounce jar)
1/2 cup shortening
1/3 cup powdered sugar
1/2 teaspoon vanilla


Here's how you make them:

Preparation
You will need a spice bottle, approximately the size of a Twinkie, ten 12 x 14 -inch pieces of aluminum foil, a cake decorator or pastry bag, and a chopstick.

Preheat oven to 325 degrees.

Fold each piece of aluminum foil in half twice. Wrap the folded foil around the spice bottle to create a mold. Leave the top of the mold open for pouring in the batter. Make 10 of these molds and arrange them on a cookie sheet or in a shallow pan. Grease the inside of each mold with a light coating of non-stick spray.

Disregard the directions on the box of cake mix. Instead, beat the egg whites until stiff. In a separate bowl combine cake mix with water and beat until thoroughly blended (about 2 minutes). Fold egg whites into the cake batter and slowly combine until completely mixed.

Pour the batter into the molds, filling each one about 3/4 of an inch. Bake in the preheated oven for 30 minutes, or until the cake is golden brown and a toothpick stuck in the center comes out clean.

For the filling, combine salt with the hot water in a small bowl and stir until salt is dissolved. Let this mixture cool.

Combine the marshmallow creme, shortening, powdered sugar and vanilla in a medium bowl and mix well with an electric mixer on high speed until fluffy.

Add the salt solution to the filling mixture and combine.

When the cakes are done and cooled, use a skewer or chopstick to make three holes in the bottom of each one. Move the stick around inside of each cake to create space for the filling.

Using a cake decorator or pastry bag, inject each cake with filling through all three holes.

Serving Size
Serves 10


Saturday, November 17, 2012

How to Make Cute Candy Thanksgiving Turkeys


These candy turkeys are tons of fun to make for classroom or office parties,  providential buffets (I don't believe in luck), Thanksgiving "hello" gifts for neighbors, or decorations for place settings.  They are easy to make- especially if you have a friend or two helping to do it assembly-line style.

I would love to give credit to the person who came up with this brilliant idea.  Unfortunately, I have no clue where I first saw it.  I've been making these for years and they are always a favorite.  It just doesn't seem like Thanksgiving if we haven't made the turkeys!


To make about 60 of them you only need 5 ingredients: 

1 package of 60 sandwich cookies (Each cookie makes 1 turkey), your choice of color
2 cans of chocolate frosting
1 cup of powdered sugar
3 bags of orange slice candies (with approximately 20 per bag so you have a total of 60)
1-2 bags of candy corn depending on how big the bag is.  You'll need 360 whole ones total. 


1. Mix 1/2 cup of powdered sugar with one can of frosting to make the frosting a little more stiff.  (Do the same with the second one if you need more frosting.)


2. Fill a pastry bag with the frosting. (Use a large star tip.)


 3. Carefully pull the cookies apart and scrape off the filling.  Discard the filling.


4. Pipe a semi-circle of icing onto half of the cookies.


5. Press 5 candy corns into the icing in a fan pattern.  Make sure they are evenly placed.  They shouldn't hang too far off of the edge of the cookie.


6. Cut the orange slices at the 2/3 mark.  Eat the smaller pieces.  The larger ones will be the bodies and should be cut at a slight slant or almost straight up depending on how good your icing is at holding them.  You can experiment a little- I usually assemble 1 completely to get a feel for how they are made (since I only make them once a year).  After that I start with the assembly line.


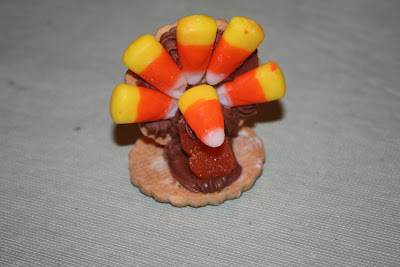
7. Pipe a 1" line of icing onto the other half of the cookies. (See below) Place the orange slices with the smaller ends toward the front and the cut ends toward the back of the cookie.  (See picture.)  Pipe a blob of icing below the 5 candy corn feathers.  This icing will be the glue that holds the feathers to the orange slice body.  In the picture below the cookie with the candy corns at the far right is an example of the feathers and the cookie with the orange slice second from the right is an example of the bodies.  So now you should have half cookie feathers and half cookie bodies.  (If your icing is hardening quickly you can do these in smaller groups.)


8.  This is the tricky part.  Take the feather cookie and press the icing from it into the orange slice.  Hold it there and pipe a chocolate dot at the back to add extra strength to hold up the cookie.  Finally, pipe a dot of icing onto the top of the orange slice and place a whole candy corn on it for the head (beak facing out!).  

Voila, you are finished!  


9.  Here's a picture of the steps all in a row.


 10.  And here is the finished product. Cute as a button and guauanteed to be eaten only by children and others who have a very high tolerance for sugar.


Enjoy!  Let me know how they turn out if you try them- and share your tips!

Saturday, March 31, 2012

Death by Sugar

A couple of weeks ago my friend J. put a picture up on her Facebook wall that was truly inspiring.  It was of a dessert she made for her son's birthday.  My teenage son took one look at it and decided it would be perfect for his birthday as well.  So, we thought we'd document the decadence in case you'd like to try it for your next big celebration.  

As with most perfect things, this dessert is poetic in it's simplicity.  Just 4 ingredients- all of which you can buy ready made if you want to.

1. Chocolate chip cookie dough
2. Oreos (double stuffed is the only way to go)
3. Brownie mix.
4. Marshmallow cream (or is it creme??)  There's no milk in it at any rate.

We're a milk-free household due to a severe allergy in our family so we opted to make homemade chocolate chip cookie dough and a brownie mix that doesn't use milk.

First you line a 9X9 inch pan with waxed paper.  You could be really careful about it and get it all nice and pretty or you could just shove it in the pan like I did.  Next, spread the cookie dough into the bottom of the pan.  I cut the dough into slices and arranged them on the bottom and then squished it all around until there were no holes and it went all the way to the sides.


Now open the package of Oreos and eat two to make sure they aren't stale.  You might want to try another one just to be sure.  Once you're positive they aren't stale place them in the pan in a nice neat pattern.  If you're a bit creatively uptight like I am you will be very satisfied that they make 4 perfect rows of four- a square!  Everyone knows the squareroot of 16 is 4 and here you have your proof.  If you're into unschooling you could call it a day for math.  (Just kidding- really.  Unschoolers are misunderstood.)  I digress.


Now you're ready to put your brownie mix on top of the cookie/oreo concoction you've got going.  Smile.  This is going to be great.


Bake it all for 30 minutes.  Cool and frost with the marshmallow creme.


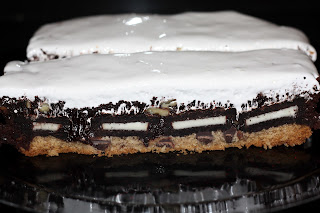
Put it in the refrigerator until you are ready to serve it.  Take a butter knife and poke around the sides to loosen the waxed paper and then pull the whole cake out by the paper.  Peal the paper off and put the cake on a plate.   As soon as you take the cake out of the fridge the marsmallow creme will start to run down the sides so hurry up and get your camera out if you want to take a picture of the layers.  Use your biggest knife to cut it into slices. 

 Sing to your special birthday person and enjoy.  If you have neighbors you like you could share with them.  Or not.  My husband declared that his heart was beating super fast after eating this.  I'd like to think it was just because we're still so in love after all these years.  Could be the sugar though.


Try it and let me know how it turns out!